Showing posts with label add. Show all posts

Thursday, April 5, 2012

How to add or update the Facebook Like Box on Blogger

This is the revised guide replacing my previous posts on 'How to add the Facebook Fan Box on Blogger' and 'How to add the Facebook Like Box on Blogger'.

The code for the Like Box plugin has changed since Facebook switched to the new Timeline layout, so the older posts I mentioned above no longer apply.


The Facebook Like Box has also been updated so that it appears on your blog even while you're logged in as the page admin.  However, the Like Box still won't work while you're in preview mode on Facebook.

Here are the new instructions for adding the Facebook Like Box on Blogger and how you can update the existing Like Box on your blog.


Instructions:

1.  Get the code for your Facebook Like Box.
You can do this through the Facebook Social Plugin Page, or from your own Facebook page by going to Admin Panel > Manage > Edit Page > Resources > Use Social Plugins > Like Box
See the pics below for more info: 
a) Open Facebook Page Admin Panel


b) From Admin Panel > Click Manage and Edit Page
c) Click Resources > Use Social Plugins

d) Scroll down and click Like Box.


2.  Under Facebook Page URL, delete the URL that's currently in the box and replace it with your Facebook Page's web address.

For example, my Facebook Page's URL is http://www.facebook.com/pages/Maria-Tan/102277350547, so that's what I pasted in the box.

Once you enter the correct URL, your Like Box will appear on the right hand side, instead of the default Facebook Platform Like Box.

3.  Customize any of the other settings, i.e. Width, Height, Color, Faces, Stream, Header and click Get Code.

The settings I used were:
width="200" (The width of your Like Box)
height="558"
Color scheme=Light (White or Black background)
Show faces ticked (Pictures of people who like your page)
Show stream ticked (Info from your wall posts)
Show header unticked (Find us on Facebook bar)


4.  Copy the code under IFRAME.
5.  Sign in to Blogger and click Layout.
6.  Click Add a Gadget.
7.  Choose Basics > HTML/Javascript
8.  Add a Title and paste the code for your Facebook Like Box under Content.
9.  Click Save.
10.  View your blog and edit the HTML/JavaScript box again if necessary.
11.  Don't forget to Save the changes once you are finished :)


Updating the Facebook Like Box on Blogger

1.  Follow the previous instructions from Steps 1 to 4.
2.  Log in to your blog.
3. Go to your Like Box and click on the Edit icon (see pic to your left).
4.  Paste the Like Box code under Content.
5.  Click Save.

Wednesday, December 15, 2010

How to add the Facebook Like Box on Blogger

An updated version of this guide can be found here: http://maria-tan.blogspot.com.au/2012/04/how-to-add-or-update-facebook-like-box.html 


Please note: 'How to add or update the Facebook Like Box on Blogger' is the new version of this post.  The post you are viewing now was made in 2010 and may no longer work.

This is an old update to a previous post I made in 2009 on 'How to add the Facebook Fan Box on Blogger'.

Instructions:
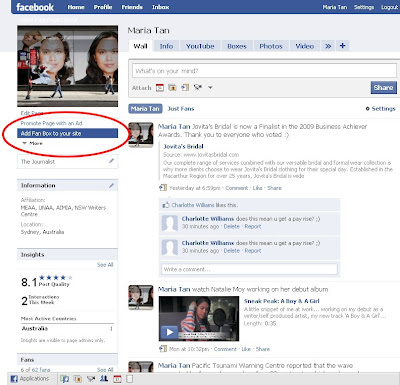
  1. Get the code for your Facebook Like Box. You can do this through the Facebook Plugin Page, or if you're already logged in to your Facebook page, go to Edit Page > Marketing and click Add a Like Box to your Website. See the pics above if you're having any trouble.
  2. Under Facebook Page URL, delete the URL that's currently in the box and replace it with your Facebook Page's web address.

    For example, my Facebook Page's URL is http://www.facebook.com/pages/Maria-Tan/102277350547, so that's what I pasted in the box.

    Once you enter the correct URL, your Like Box will appear on the right hand side, instead of the default Facebook Platform Like Box.
  3. Customize any of the other settings, i.e. Width, Color, Connections, Stream, Header and click Get Code.

    The settings I used were:

    width="200" (The width of your Like Box)
    height="554" (See Step 10 for more details)
    Color scheme=Light (White or Black background)
    Connections=6 (How many pictures of people who like your page show up)
    Show stream ticked (Info from your wall posts)
    Show header unticked (Find us on Facebook bar)

  4. Copy the code under XFBML.
  5. Sign in to Blogger and click Design.
  6. Click Add a Gadget.
  7. Choose Basics > HTML/Javascript
  8. Add a Title and paste the code for your Facebook Like Box under Content.
  9. Click Save.
  10. View your blog and edit the HTML/JavaScript box again if necessary.

    To change the height of your Facebook Like Box, edit the code you pasted in the HTML/JavaScript box and paste height="554" after the width="..." parameter. You can customize the height to suit your own blog by replacing the numbers 554 with your own value in the quotes.

    E.g. For a Like Box with the height of 200 pixels, paste height="200" instead.

  11. Don't forget to Save the changes once you are finished :)

Thursday, July 23, 2009

How to add the Facebook Fan Box on Blogger

An updated version of this guide can be found here: http://maria-tan.blogspot.com/2010/12/how-to-add-facebook-like-box-on-blogger.html


Please note: 'How to add the Facebook Like Box' is the new version of this post.
The post you are viewing now was made in 2009 and may no longer work.
  1. Get the code for your Facebook Fan Box. This can be done in a few ways, see the image above, or visit the fb Fan Box Wizard.

  2. Sign in to Blogger and go to Layout > Page Elements.

  3. Click Add a Gadget.

  4. Choose Basics > HTML/Javascript

  5. Add a Title and paste the code for your Facebook Fan Box under Content.

  6. Click Save.

  7. Preview and edit again if necessary. You can customize certain settings of the fan box.

  8. Don't forget to Save the changes once you are finished :)

For my sidebar FB Fan Box widget to fit in snugly with my Minima Lefty template, I changed:

fb:fan connections="6"
width="200"
height="554"

Note: The scroll bar doesn't work in preview mode.